Table of Contents
X-Wing
technique
Welcome to the Sudoku Academy by Sudoku X. In this expert series, we build on the advanced skills acquired at hard gameplay levels. As you encounter increasingly complex puzzles, you will need to further develop your Sudoku solving skills. In this tutorial and beyond, you will learn techniques and strategies that bridge the gap from hard to expert gameplay. Today, we will introduce an elimination technique called X-Wing.
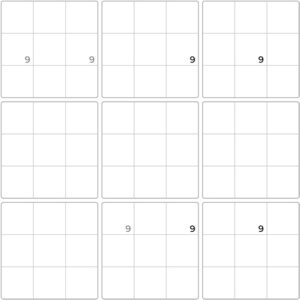
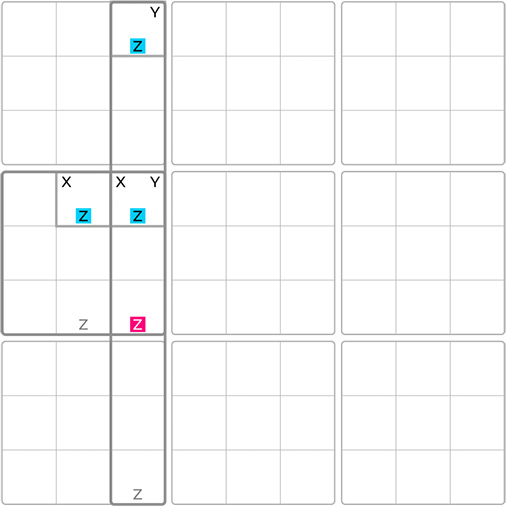
The X-Wing technique, a type of fish technique, is similar to its more complex counterpart, the Swordfish. To identify an X-Wing, look for two columns, each containing only two empty cells with the same potential candidate, known as the “fish digit”. If these cells align with the same two rows, you can eliminate all other candidates in those rows. In such cases, either of the diagonals with the two cells at each end containing the fish digit must be true, forming an “X”.
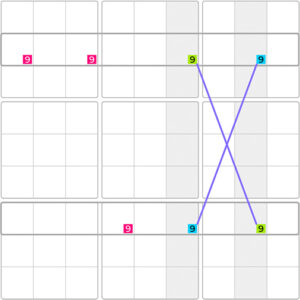
Specifically, either the two 9s highlighted in green or the two 9s highlighted in blue have to be true. Consequently, any other 9s located in the same two rows can be eliminated.
Note that the X-Wing technique always works across 4 different blocks.
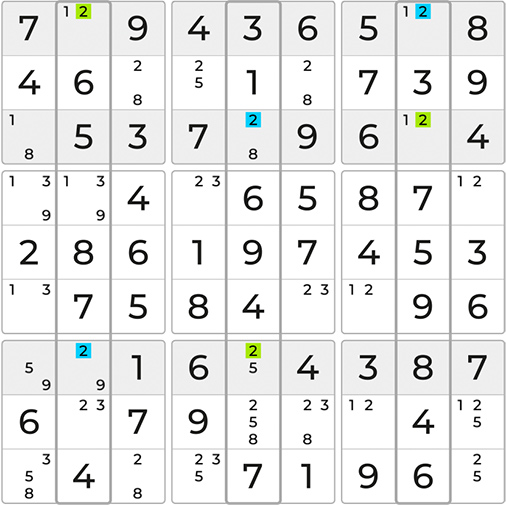
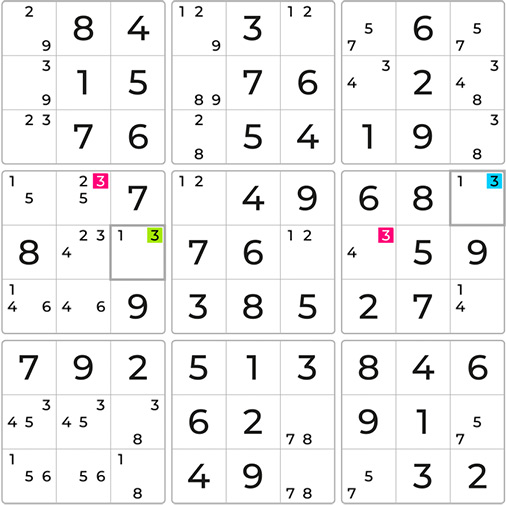
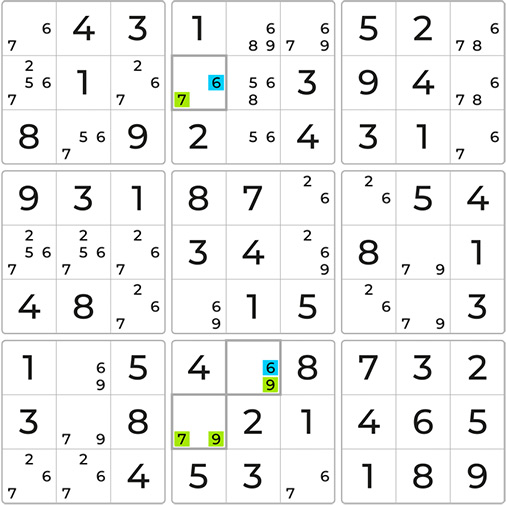
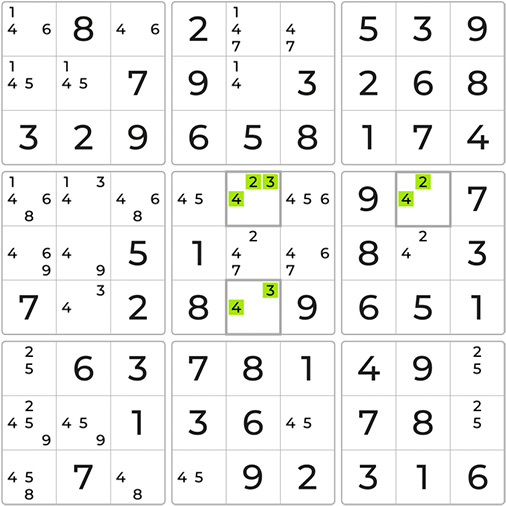
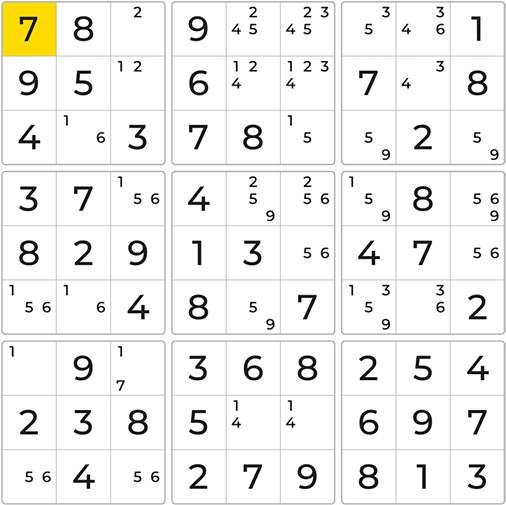
Let’s work through an example using a Sudoku board with the notes already filled in.


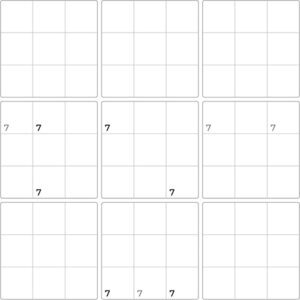
When we focus on the 3rd and 4th columns, we see that the number 5 can only be placed in the empty cells where the 5s are highlighted. Since these cells are confined to the same rows, it must be true that one of the highlighted 5s must be placed in each row, forming one of the diagonals. This allows for the removal of 5s anywhere else in those rows. Let’s eliminate these.


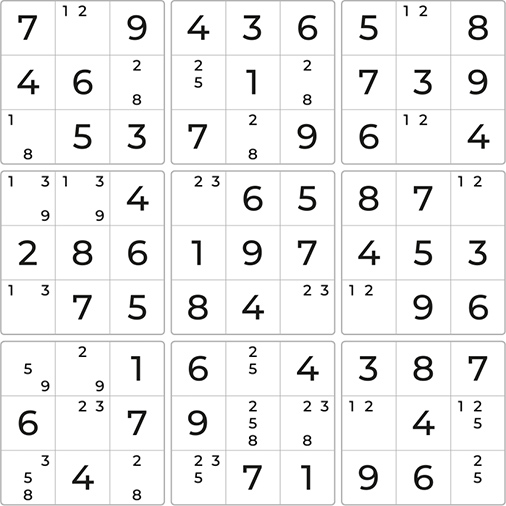
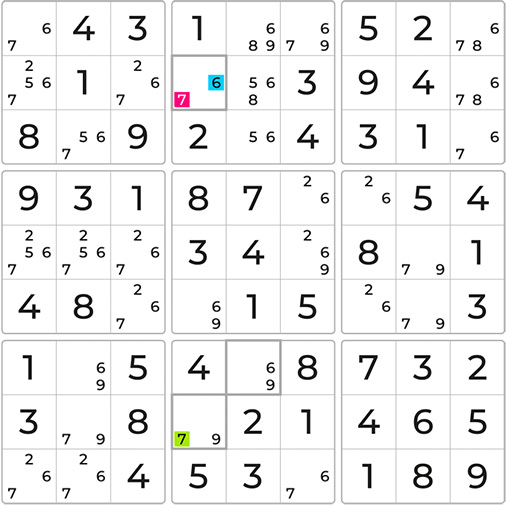
The same technique can be applied starting with rows instead of columns. Continuing with the game, when we look at the highlighted rows, we see that the number 6 can only be placed within the 1st and 6th columns, creating our “X”. Using the same logic, this time removing candidates in the columns, we can eliminate the 6 from the first empty cell on the board.
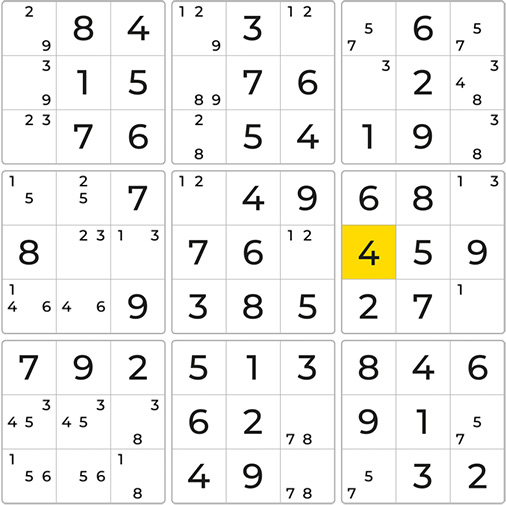
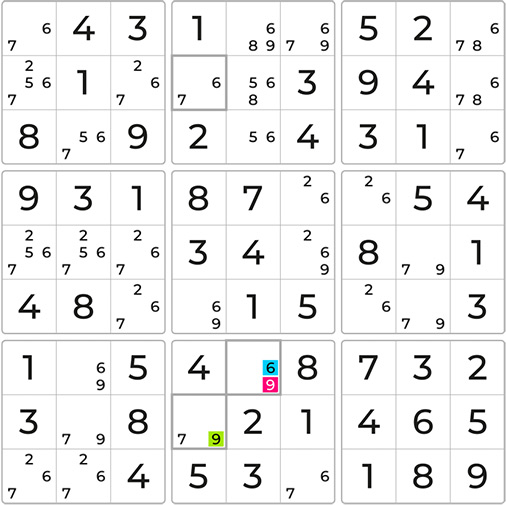
With the 5 and 6 eliminated, we can confidently place the 9 in the highlighted cell and continue solving the puzzle. Super!
Be sure to check out our other videos for additional elimination techniques on your path to becoming a Sudoku Master! Practice your skills with Sudoku X and master the game at levels beyond hard difficulty.
Swordfish
technique
The Swordfish technique operates similarly to the X-Wing technique. We highly recommend completing the X-Wing tutorial before proceeding with the Sudoku Swordfish, if you have not done so already.
The X-Wing technique involves finding a rectangle where the target digit, referred to as the “fish digit,” is located at each corner. By using this technique, we can eliminate other instances of the fish digit in either the row or the column. Swordfish extends this principle to nine cells across three rows and columns. To identify a Swordfish, find three columns, each containing only two or three cells possible for the same candidate. If these cells align with the same three rows, all other candidates in those rows can be eliminated.

Consider the highlighted number 7. If either the three green or the three blue 7s are true, then the number 7 is covered in all three rows, allowing us to eliminate any other 7s in these rows.
Like the X-Wing, the Swordfish technique involves at least four different blocks.
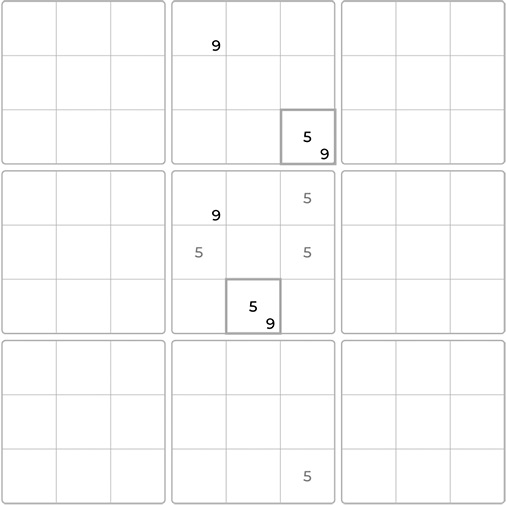
Let’s work through an example using a Sudoku board with notes already filled in. Contrary to the previous example, rather than first examining the columns, we will start with looking for rows. Focusing on the number 2, observe that it can only be placed in two cells in rows 1, 3, and 7. These cells nicely align with columns 2, 5, and 7, forming a Swordfish pattern.


Since either the 2s highlighted in green or the 2s in blue must be true, the columns 2, 5, and 7 are effectively covered by a 2, allowing all other 2s in these columns to be eliminated. Let’s proceed with this elimination.
After removing the 2s, we can confidently place the 3 and continue our game. Terrific!
Be sure to check out our other videos for additional elimination techniques on your path to becoming a Sudoku Master! Practice your skills with Sudoku X and master the game at expert difficulty levels.
W-Wing
technique
The W-Wing is a powerful elimination technique whose pattern is relatively easy to identify. First, locate two empty cells that belong to different houses and contain the same two possible candidates. If these bi-value cells are connected by a strong link based on one of the candidates, a W-Wing pattern is formed. A strong link in this case means that this candidate is limited to only two possible cells within a row or column. Subsequently, the other candidate will end up being placed in one of the bi-value cells, and can be eliminated from any cell that intersects with both these cells.


Let’s work through an example using a Sudoku board with notes already filled in.
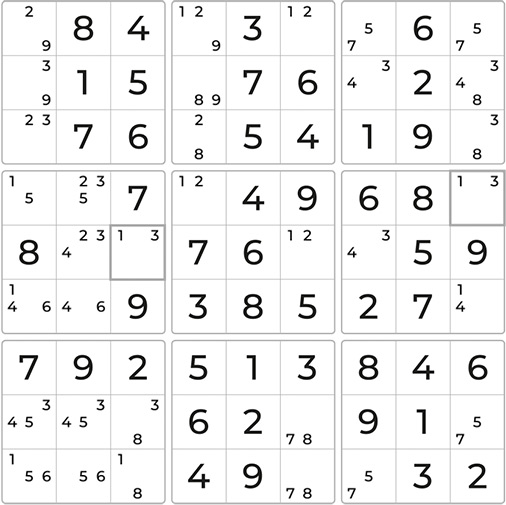
In examining the board, we’ll search for two bi-value cells containing precisely the same two candidates located in different houses. See the highlighted cells holding numbers 1 and 3.
Next, we’ll establish a strong link with one of these candidates. In this case, consider the number 1 in row 6, which can only be placed in two specific cells, forming a strong link. These cells correspond to the houses of the bi-value cells.


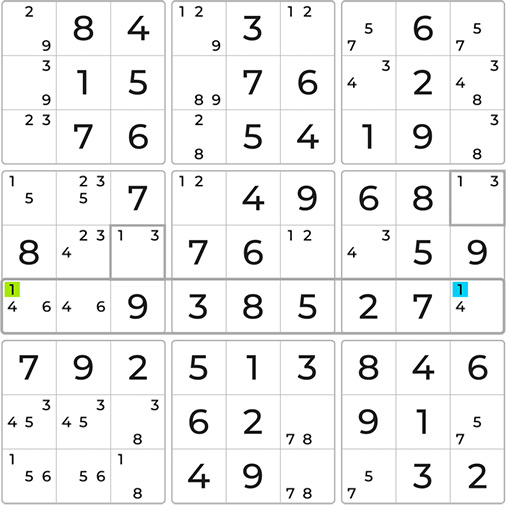
When 1 is placed in the first empty cell, the value 3 becomes valid and must be placed in the first cell, both highlighted in green. Conversely, if 1 is placed in the last empty cell, the value 3 ends up in the second bi-value cell, now highlighted in blue.
Due to the strong link established, we’re certain that number 3 will occupy one of the highlighted cells. Consequently, any other 3s in cells intersecting with both bi-value cells can be eliminated. Let’s proceed with this elimination.
After removing the 3s, we can confidently place the 4 and continue our game. Super!
Be sure to check out our other videos for additional elimination techniques on your path to becoming a Sudoku Master! Practice your skills with Sudoku X and master the game at expert difficulty levels.
Y-Wing or XY-Wing
technique
The Y-Wing is an effective elimination technique, though its pattern can be challenging to identify. To apply the Y-Wing technique, we begin by searching for a cell with only two potential candidates, X and Y, known as the pivot cell. Next, we look for two additional cells, called pincers, each with two candidates, that share a different house with the pivot cell. One pincer cell contains candidates X and Z, while the other contains candidates Y and Z. When such a pattern is found, any cells where the pincers intersect can have candidate Z removed.

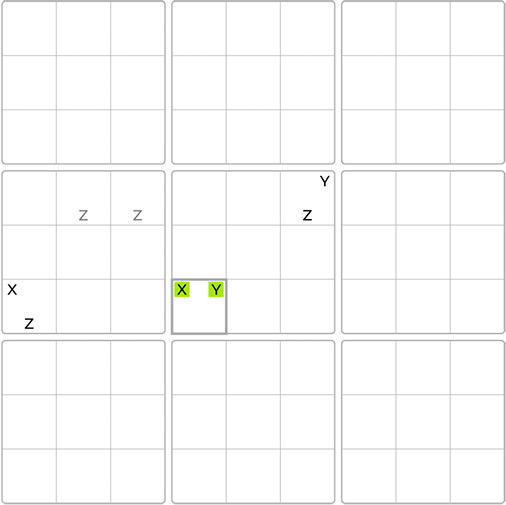
If the pivot and pincers share a maximum of three blocks, potentially one candidate can be eliminated. This scenario changes if they share only two blocks, potentially providing more elimination opportunities.
Let’s work through an example using a Sudoku board with notes already filled in.
To start, we need to find a bi-value cell with exactly two candidates. Let’s select the highlighted cell with potential candidates 7 and 9, which we will refer to as the pivot. Next, we’ll examine the board to identify the pincers. The pincers must share one of the houses, either the row, column, or block, with the pivot. Upon searching the column and block, we find two bi-value cells; each shares one candidate with the pivot and another candidate, both of which are the number 6. Observe the highlighted cells.


If the pivot is assigned a 7, then the number 6 must be placed in the column cell. Conversely, if the pivot is given a 9, the number 6 must be placed in the block cell. It now becomes evident that the number 6 will ultimately be placed in one of the pincers, allowing for the removal of the 6 from any intersecting cells between the pincers. Let’s eliminate the highlighted 6s.
After removing the 6s, we can confidently place the 5 and continue our game. Nice!
Be sure to check out our other videos for additional elimination techniques on your path to becoming a Sudoku Master! Practice your skills with Sudoku X and master the game at expert difficulty levels.
XYZ-WING
technique
Before proceeding with the XYZ-Wing technique, it is strongly advised to have completed the Y-Wing tutorial, if you haven’t done so already. The XYZ-Wing operates in a similar fashion to the Y-Wing.


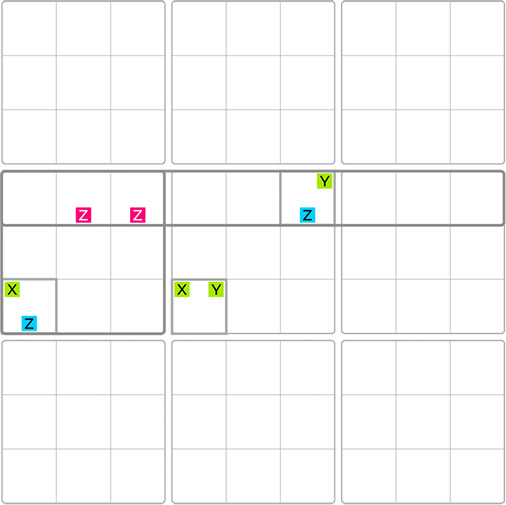
Both techniques involve three cells. However, the distinction between the XY, Z-Wing and the Y-Wing lies in the pivot’s involvement. In the XYZ-Wing, the pivot holds not only two candidates but also a third, which is typically the same number, Z, that the pincers share in the Y-Wing. This third number, which could end up in any of the three involved cells, can be eliminated from cells that intersect between the pivot and the pincers. As a result, the XYZ-Wing always operates across two blocks. Generally, the XYZ-Wing provides fewer elimination opportunities compared to the Y-Wing.
Let’s look at an example together to understand this technique better.
To start, we must identify a cell containing exactly three possible values. Let’s focus on the highlighted cell with candidates 2, 3, and 4. This cell will serve as our pivot. Next, we closely examine the board to locate the pincers. The pincers must be in the same house, either the row, column, or block, as the pivot. Analyzing the row and block containing the pivot, we discover two bi-value cells. These cells each share one candidate with the pivot and have a shared candidate, number 4.

Now let’s examine the placement of number 4. We take the pivot as a central starting point. If the number 4 would be placed in the pivot, then the pincers would hold the numbers 2 and 3. Conversely, if either the number 2 or 3 is placed in the pivot, the 4 ends up in one of the pincers.

Consequently, and although we do not know yet which cell, the number 4 will end up in any of the three cells, allowing us to eliminate the number 4 from any cells intersecting with the pivot and pincers. Let’s remove the 4s from the highlighted cells.
After removing the 4s, we can confidently place the 5 and continue our game. Super!
Be sure to check out our other videos for additional elimination techniques on your path to becoming a Sudoku Master! Practice your skills with Sudoku X and master the game at expert difficulty levels.
Skyscraper
technique
The Skyscraper is a straightforward and frequently occurring pattern that is easy to identify. It’s a unique variation of the Turbot Fish technique. To better understand this technique, we strongly advise completing the Turbot Fish tutorial before proceeding.


For the same digit, identify two strong links within two columns on the Sudoku board: cells A and B, and cells C and D. A strong link means that the digit is confined to only two possible cells within those columns, so they cannot both be false at the same time.
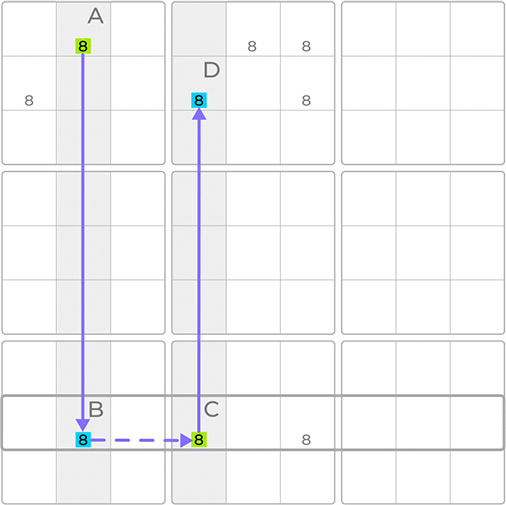
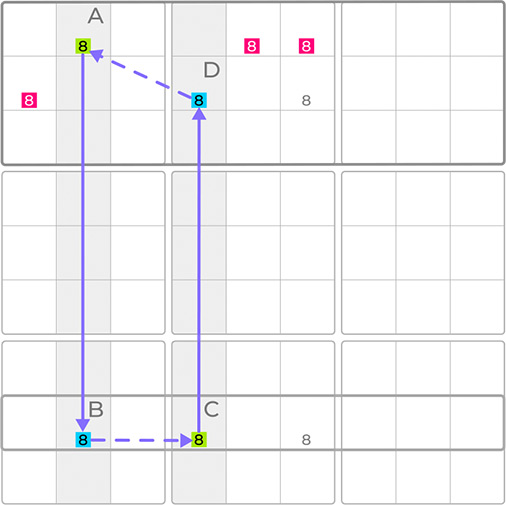
If two of these candidates, let’s say B and C, share the same row forming the base of the skyscraper, then one of the other two candidates forming the top of the skyscraper must be true. Any candidates that intersect with both of these cells can therefore be eliminated. For this technique to work effectively, the candidates at the top of the skyscraper need to share the same band, as highlighted. The same band, in this case, meaning a row of blocks.
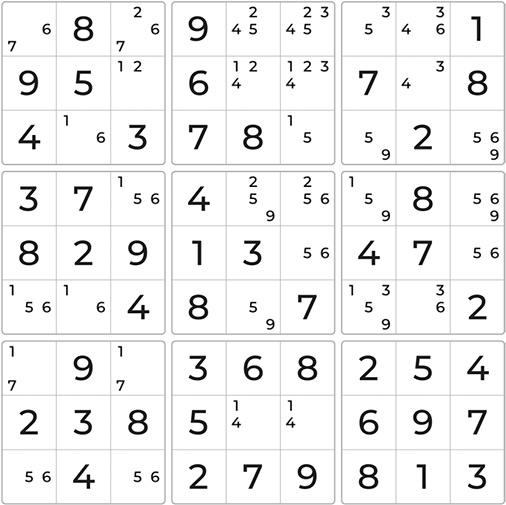
Let’s go through an example using a Sudoku board with notes already filled in.
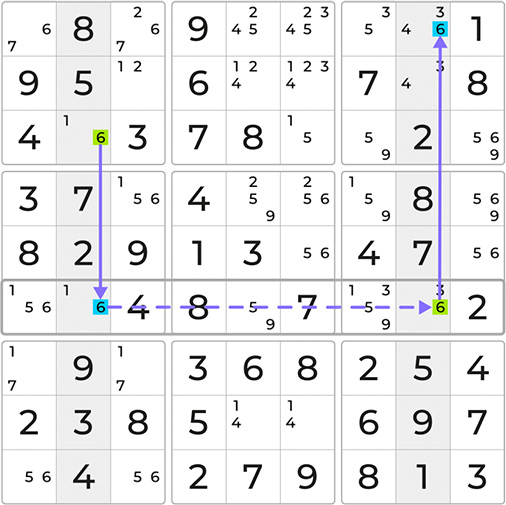
Let’s choose the number 6 as our target digit. Examining the board, we find our first strong link in the second column where the 6 can only be placed in either the third or sixth row. Continuing our search, we discover another strong link for the 6 in the eighth column. Since two of the 6s share the same row, the base of our skyscraper is formed.
While the 6s within the base cannot both be true simultaneously, it can be easily seen that either the 6s highlighted in green or the 6s highlighted in blue must be true. Consequently, it follows that any other 6s intersecting the cells at the top of the skyscraper can be removed. Let’s eliminate these.
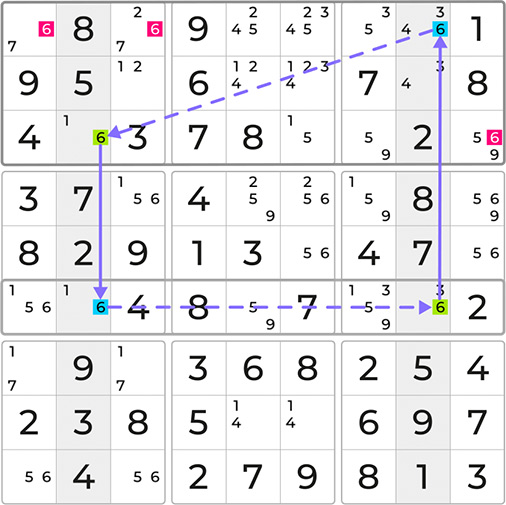
Evidently, for this strategy to generate elimination opportunities, cells positioned at the top of the skyscraper must share the same band. It is important to note that any Sudoku puzzle can be rotated 90 degrees, allowing the same approach to be applied to rows rather than columns.
Having eliminated the number 6 in the first cell, we can confidently place the 7 and continue our game. Awesome!
Be sure to check out our other videos for additional elimination techniques on your path to becoming a Sudoku Master! Practice your skills with Sudoku X and master the game at expert difficulty levels.